Friday, December 14, 2012

A Few of My Favorite Things From Attached Inc and Havel's Sewing

Finally, with all my holiday shopping completed, I am getting a chance to return to this fun piece that I had put on hold. I have been in an abstract whirlwind as the year winds down, totally unusual for me but sometimes the art just has to come out as it will. This piece is still a work in progress but I thought I might post a mini tutorial about how I used Transdoodle, Mistyfuse and Goddess Sheets to arrive at this point. These are some of my most favorite products and I thought I would share them with you. They make my life so much easier! I first began with a sketch of unusual cogs and enlarged the main pattern to the desired size. Then came the fun part of choosing fabrics. Here, I chose to pull out all the wild and playful fabrics that had managed to make their way into my stash. I proceeded to iron Mistyfuse, a lightweight fusible to the back of my fabrics using a large Goddess Sheet. Mistyfuse is my absolute favorite fusible as it does not gum up the needles when sewing and does not interfere with the hand of the fabric. The Goddess Sheet is my ultimate choice for pressing sheets. If I get fusible on the pressing sheet, it wipes right off with a kitchen scrubber. Easy to clean, gotta love that!   

Once the Mistyfuse was fused to the back of my fabrics, I transferred my design to the right side of the fabric by placing a sheet of Transdoodle, chalk paper on top of the fabric. I then placed my pattern on top of the Transdoodle and with a mechanical pencil (containing no lead), I traced over the design to transfer the chalk image onto my fabric. Basically, just applying pressure allows the image to be transferred. So easy and no need for a light table or fooling around with trying to reverse the image! Once the design was transferred to the fabric, I used my favorite Havel Scissors to cut the design out. This particular pair of scissors happens to be micro serrated and cuts so beautifully. Such a joy to work with! I am hoping that I will have some time over the holidays to finish this project. As usual, deadlines are looming and I would love to eek out one more project before the New Year arrives. Hope you enjoyed this post and I wish you all, Happy Holidays!

Friday, December 7, 2012

Coasters for the Holidays: A Tutorial for Fast, Inexpensive Gifts

 
The holidays are upon us and I have been working on handmade gifts for my friends and family this week. I am so jazzed about the way they turned out! My barometer for success is feeling like I, myself would like to receive these and I would! Yay, it's a success! For only  $31 plus a few supplies from my studio and a quick trip to Home Depot, I have managed to make presents for almost everyone my list. I purchased a case of 100 4X4 tiles and a 32 oz can of Indoor/Outdoor Helmsman Spar Urethane by Minwax. Within 3 days, I was able to make 25 sets of 4 coasters for each person on my list. Each set was made together such that they received the same colors and supplies. I began by first coating the tiles with a thin layer of  Isopropanol aka rubbing alcohol. Now 
 
. before you head out to purchase a big bottle of alcohol, let me say that for 100 tiles, I used approximately 1/4 to 1/3 cup of alcohol. It really does not take much! Next, I added a few drops of ink. Remember the days when we used to mix alcohols with inks to make beautiful works of art? Well, it's the same concept here. I used both acrylic inks by Liquitex as well as Bombay India Inks by Dr. Ph Martin. The alcohol acts as both a carrier for the inks to travel across the tile and a drying agent. I typically used 2-3 colors per tile thus allowing a pleasing blend of colors. You may recall, I said  
it took me 3 days to finish 100 coasters. Well, I didn't mean 3 full days as part of this time was used for drying time along the way. Still, if you wanted to do it in 1 1/2 days, it is totally doable! Meanwhile, once the inks are dry, approximately 2-3 hours, I embellished the tile by stamping designs with gold metallic craft paint that I had in my studio. After the tiles dry (approximately 5-10 minutes), the edges were subsequently painted with a matching color of acrylic craft paint. Allow 20 minutes for edges to dry.
Turning out pretty good! Now, time to add the Minwax clear gloss sealer. Here, I added 2 thick coats to the top and sides of the coaster. It was allowed to cure for a minimum of 6 hours or overnight. Next, I took a single sheet of acrylic felt that I had previously purchased from JoAnn's and cut it with a rotary cutter into small squares or rectangles to create a total of 400. I did not measure but simply guestimated size. When the tiles were dry, I hot glued felt squares to the bottom of the coaster in each corner. Wa la, done and gorgeous! I also had a go with using maps and photos of my artwork. For these, I used modge podge to adhere the maps and photos to the tiles. When dry, I noticed the edges of the photos had a difficult time adhering, so I used gel medium with a spatula to ensure that the edges were firmly glued in place. Once dry, they were coated with 2 thick coats of sealer and allowed to dry. Felt bottoms were added to protect the table surface.  
 I love that this was a fast, easy, enjoyable and inexpensive project that can be created alone or with friends and family. And best of all, it kept me away from the stores and crowds of people. Who knew a simple white 4X4 tile could be transformed into a work of functional art.
         
 I hope you enjoyed this tutorial and I wish you a most Happy Holiday season.  

Thursday, November 29, 2012

Time Travel

Hello, things are heating up in the studio. The last few weeks I have been working on my entry for Quilt Con, the first international Modern Quilt Show and conference to be presented by the Modern Quilt Guild here in Austin in February 2013. Before I could really get started, I had to familiarize myself with what constituted a modern quilt versus a contemporary quilt, so to speak. Herein lies the answer to a whole new wave of quilters that are emerging with a style of their own. Armed with a pallette consisting largely of solid colored fabrics including gray, these artists are creating classic design elements with bold graphics in mind. Some embrace a minimalist approach while others focus on negative space. Quilts may be pieced or appliqued. They may in fact involve the manipulation of traditional block patterns to accomodate a more modern feel.
In contrast, comtemporary quilt artists tend to embrace traditional design by using contemporary fabrics and color choices. A contemporary pallete is quite different as it employs tone on tone fabrics vs the solid colored Kona cotton pallette that is reminiscent of modern quilters. Contemporary quilt artists also work with a larger array of prints to convey texture. That being said, I found my modern pallette sorely lacking as I tend to stay away from solid colors. As a representational art quilter, blending is a huge part of my work. Even my solid colors are tone on tone or marbelized to allow for easier transition from one fabric to another. So off to my local quilt shop, I went. Time Travel is my response to the new modern quilt movement. This piece measures 19" X 24" and was inspired from a personal challenge to work in a different style than I am normally accustomed to.  I have learned alot from this exercise. First, I found that working with this pallete is harder than you might think! Secondly, the representational artist in me still managed to escape as I found myself thinking of this design as a portal of doorways, each with a new horizon, each representing the past, present and future with connections along the way. Crazy, I know! Sometimes, I find that no matter how hard I try, I can't seem to shake the desire of seeing something realistic in an otherwise abstract piece. I have observed this phenomenon in other artists as well. It’s always funny to see what is most predominant in our work. Lastly, I found this was a great exercise in learning to let go and challenging myself to stretch and grow in new directions. And that is always a good thing! I hope you enjoyed this post and I encourage you to visit some of the artists from Off the Wall Friday hosted by Nina Marie at http://ninamariesayre.blogspot.com/ . Thanks for stopping by!

Friday, November 16, 2012

Dinner at Eight Artists Celebrate “Rituals” Exhibit in Houston

Welcome, today is my first blogpost for Off the Wall Friday hosted by Nina Marie at http://ninamariesayre.blogspot.com/ . I think it is a great way of connecting with other artists and the community. And speaking of community, I am honored to be a part of Dinner at Eight Artists. What a fabulous group of women! This month, we gathered together in Houston to celebrate the new “Rituals” exhibit. Pictured above are Jeannie Palmer Moore, Judy Coates Perez, Barb Forrister, Susan Brubaker Knapp, Rachel Parris, Leslie Tucker Jenison, Jamie Fingal, Gayle Simpson, Loris Bogue, Sue Bleiweiss, Frances Holliday Alford and Lyric Kinard. This photo was taken after our interview with Bonnie Lynn McCaffrey at the International Quilt Festival in Houston, Texas.


Microphones for some reason always make me nervous but somehow Bonnie was able to put me at ease with her warm and inviting manner. Not to mention I am one of her biggest fans. I absolutely love her work! Following the interviews, we posed for a group photo. Our sponsor, Havel’s Scissors was there and I got a chance to check out their fabulous products. I will be blogging about this soon but for now, let me say that this exhibit was fantastic and in my mind, our best, yet. Later, that evening, we met up for dinner at yep, you got it, 8. So much fun to catch up with each other and discuss plans for next year. We also received news that Rituals has been invited to exhibit at the Open European Championship in the Netherlands next spring. Yay! How fun! Have to say, sometimes, I am so envious of my quilts and the places they travel. Speaking of travel, I bid you to visit Nina’s blog and some of the other artists featured on Off the Wall Friday. Stop by and leave a comment. We would love to hear from you!

Sunday, November 11, 2012

Peacock Series Using Twinkling Waters by Luminarte

I am so delighted to be chosen as a guest artist on Creative Imaginations , Luminarte blog. While in Houston at the International Quilt Festival, I came upon this fabulous booth with the most beautiful paints in every nook and cranny. I knew it was a very very dangerous place for me to be but still I could not help myself, especially when I noticed the sets of Twinkling H20s! You may recall that I have been using these luscious, shimmering waters  in my peacock series. What a fabulous way to impart luminescence to those wonderfully, majestic peacock feathers! Twinkling Water's shimmering watercolors are composed of pigment intense, mica infused watercolors and come in a variety of colors. They can be mixed with one another to provide even more options. Wow! Who knew they had so many colors?! Luminarte has also come up with a line of Silks, Acrylic Glaze paints that are full bodied, creamy, shimmering paints. I knew, I just had to try some. My favorite colors included Boysenberry, Nutmeg, Mallard Green, Rich Cobalt, Sunburst, Ginger Peach, Pretty Peridot and Honey Amber. I will be heading up to the studio, soon to try these out on yet another  peacock piece and will be blogging about them soon! And last but not least, I purchased a Copper Pearl Pen that is a 3dimensional paint. These come in a multitude of colors and are so much fun! I have yet to try the Bare Elements sparkling powders but they look most intriguing! To find out more about their products, please visit  http://creativeimaginations.typepad.com/luminarte_paints/ .
Sunrise Serenade and Primavera
 
The Gift of the Magi
 

Monday, November 5, 2012

Open Studios Sponsored by Craftsy at International Quilt Festival


I am back from Houston and finally getting a chance to blog about it. Wow, what an experience! On Thursday, I had the distinct pleasure of being one of 4 artists to open up for Open Studios sponsored by Craftsy.com at the International Quilt Festival in Houston, Texas. I was scheduled from 10-12 to demonstrate 3Dimensional flowers. I had just created 4 new flower patterns including irises, cala lilies and two new surprise flowers for this event. This year's Open Studios was moved from the vendor section of the show to Main Street near the Food Court. This was a fantastic decision made by Chief Creative Officer, Patricia Chatham Bolton at Quilts, Inc. I have been doing Open Studios for three years and never have I seen so much traffic. What a terrific idea! Yay, Pokey! You're a genius! In 2 hours, I had completely run out of business postcards. Crazy, I know but the traffic was phenomenal!
Open Studios is one of my favorite things at festival. I love seeing friends, meeting new people and sharing my work with others. This year was the best, yet! I did a second session of Open Studios on Friday from 12-2 and the crowds had grown even more. I think people really enjoyed seeing the demo and the new patterns were a hit!

If you missed out on all the fun and are interested in taking a class, please visit http://www.freespiritartstudio.blogspot.com/p/workshops.html for more information.


Sunday, October 21, 2012

Postcards and Artist Trading Cards for IQF 2012


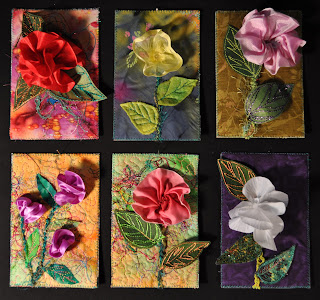
  I have been working on postcards and Artist Trading Cards for the upcoming International Quilt Festival in Houston. This year, I will be doing two Open Studio sessions on 3Dimensional Wildflowers The first session will be on Thursday, November 1st from 10-12 and the second one is scheduled for Friday, November 2nd from 12-2 p.m. I thought it might be nice to have some additional samples on hand and postcards seemed to work well for this purpose. This year's Open Studios is brought to you by Craftsy. For more information, please visit http://www.craftsy.com/ or http://pokeysponderings.com/2012/10/18/open-studios-at-quilt-festival-brought-to-you-by-craftsy/ . I have created 6 postcards and 10 Artist Trading Cards for this event. I have never participated in ATC's but I was encouraged to do so this year. The idea is that folks can come  by and pick up a small ATC if they leave one of their own creations. How cool is that? This is a wonderful way to acquire a small piece of art by some of your favorite artists. I know I will be on the lookout for some of mine! I hope people will like these, though I only made 10! Yet another fantastic way to acquire art at a very affordable price while you are at festival is to check out the Pet Project Postcard booth. I have also created a couple of abstract postcards for this wonderful cause. Postcards can represent pets, animals, landscapes or be created in an abstract style. These postcards will be sold for $20 each with the proceeds going to benefit Friends for Life, a no kill shelter. For more information on how you can get involved, please visit http://pokeysponderings.com/2012/09/28/please-take-our-quilt-festival-pet-project-postcard-pledge/ . 

Friday, October 19, 2012

The Gift of the Magi

The Gift of the Magi by Barb Forrister
This month has been crazy, busy but in a good way! Lots of wonderful shows going on in the area, new and upcoming workshops that I will be teaching and getting ready for the big International Quilt Festival in Houston. Still, I have managed to log in long hours in the studio working on art. One piece in particular, The Gift of the Magi was created for the Copper Shade Tree Gallery Art in Fiber 2013 show. The show was juried by Karey Bresenhan of Quilts, Inc. Wow, what an honor to be included! I am so tickled! Inspired from

a photograph, this bird pranced around and posed in all his glory for a good 20-30 minutes while I photographed him from all angles.  When I got home, I had a few hundred photos of him which I eventually narrowed down to one. I sketched and drew the photo and then blew it up such that it could be transferred to fabric. This piece measures 30.75" X 38.5." It is the third piece in my peacock series and I have decided to incorporate some metallic and mica paints to reflect the irridescence that is often seen in peacock feathers. The Gift of the Magi was created with acrylic paints including Setacolor opaque and transparent paints, Stewart Gill, Jacquard, DecoArt SoSoft, Sparkling Mica and Pigment Watercolor paints by US Art Lest and Twinkling Waters Shimmering Watercolor by LuminArt. I have also used watersoluble wax pastel crayons by Caron d' Ache and water soluble oil pastels by Portfolio. The Portfolio Series offered very bright, vivid colors however they were difficult to heat set. Next time, I will stick to the Caron d'Ache as they are easier to work with and their color stays put! This piece took 3 weeks to paint as each color had to be mixed and blended such that it presented an accurate and cohesive showing. Here the key was to blend the feathers in with the background as it changed from dark to light colors. With so many feathers, this is difficult to accomplish!
This piece was stitched with trilobal polyester threads from Superior in almost a hundred different thread colors such that the stitching can be seen but it still does not detract from the painting. Edges are finished with a facing. I am hoping to mount this piece on a painted deep navy canvas. I will have to build it myself, as this is not a standard size and I could not bring myself to cut it down for the sole purpose of fitting on a standard size canvas. Some things are just worth creating special frames for! I really enjoyed creating The Gift of the Magi and hope that it will find a good home. My daughters are lamenting the fact that they cannot keep it but with so many photos to choose from, I can always make more. To see more pictures, and the photo from which The Gift of the Magi was inspired, please visit http://www.barbforrister.com/the-gift-of-the-magi 

Wednesday, October 17, 2012

Violet: Part 5 in the Victorian Lady Series


Remember the Victorian ladies, Ruby and Scarlet that I completed last December? There are nine ladies, all of which have been hand appliqued, embroidered with DMC and/or ribbon embroidery floss, hand beaded and embellished with trinkets, trims and lace. The first two pieces in the set, I did in fact, hand quilt as at the time, I felt the need to complete them all by hand. I really did have good intentions, however, while I greatly appreciate the beauty of hand quilting, it is just not for me! I am much more in tune with my machine as it hums along. And so for years, these pieces have been lingering in my closet waiting to be finished. The last time, my grandmother visited me, we pulled them out and she expressed that she would like to have them.   
 
I gave her the first two pieces that had been hand quilted right then and for Christmas, I gave her two more pieces, Ruby and Scarlet that I machine quilted. She was thrilled and I am happy they have found a new home! This month is her birthday and I have completed another Victorian lady for her collection. This one is named Violet. Are you sensing a theme with regards to their names and the colors of their dresses? Seems easier to remember their names that way. To be honest, I cannot recall the names of the first two, although, Pauline comes to mind. They may need to be renamed as well! I have still yet to have time to dig and search around the studio for the name of the artist who created these patterns. Perhaps after the holidays, I can find that out unless of course, someone here knows the answer. Violet was machine quilted with Superior trilobal polyester thread to bring out details in her dress. The background was broken up by machine quilting parallel flowing lines that radiate out towards the bottom. On top, it is broken up by stippling to add interest and break up the space. She is adorned with trim, lace, embroidery ribbon and floss, buttons and trinkets. I have just shipped her off to my Grandmother to join her new friends. I hope she is accepted well!

Monday, October 15, 2012

2012 Uptown Blanco Quilt Show

The Uptown Blanco Quilt Show is this weekend, Friday, October 12 - Sunday, October 14. The Opening Reception was held on Friday from 5-6:30 p.m. Sadly, I was unable to attend as I was held up in the studio completing a piece for a deadline the next day. Coming down to the wire, that meant the same piece needed to be delivered in person on Saturday. When I returned to Austin, yesterday, this lovely photo was posted on my facebook page by my dear friend, Kathy York. "Artist Garden," a group collaboration led by Connie Hudson with Kathy York, Sherri Mc Cauley, Annie Smith, Cindy Potter Henneke, Suzan Engler, Leslie Tucker Jenison, France Holliday Alford and Barb Forrister received a lovely blue first place ribbon. I absolutely love this piece! It  incorporates the beauty and style of each and every artist and it was a joy to create! So blessed to be a part of it all!  
"Songbird" placed second followed by  "Austin tatious" in third place. You can imagine my surprise! Never in my wildest dreams, did I ever think this would happen. I feel extremely blessed and fortunate to be a part of the Austin Art Bee and to work with such amazing women Each year, we work on group collaborations with every new piece bringing unique challenges and creativity to the forefront. Artist Garden was made in 2011 and came together so effortlessly, Always a good sign!  
This is "Austin tatious'" first time out in competition and I am so delighted that it was received well. Additionally, "Welcome to my Garden" was on the program cover, a treat for sure! This weekend has been so fantastic, I could not ask for any better. Blessed with art, opportunities and rain, I have been asked to teach at next year's show at the beautiful Uptown Blanco Quilt Show. I am so jazzed about this. It is a beautiful facility with a wonderful venue!

Tuesday, September 25, 2012

Sunrise Serenade in Quilting Arts Magazine

I am so jazzed that a sampling of the new Dinner @ Eight Artists "Rituals" exhibit is featured in the October/November issue of Quilting Arts magazine. The issue features Judy Coates Perez on the Cover with her fabulous "Eight of Cups" piece. What an awesome piece! There are two articles that highlight Dinner @ Eight Artists. The first is "Q&A with Curators Jamie Fingal and Leslie Tucker Jenison" by Vivika Hansen DeNegre. This piece focuses on how Dinner at 8 Artists was founded, how it's themes are developed for annual exhibits and how the shows are juried by invitation. Jamie and Leslie foster a wonderful goal of balancing both established and emerging artists to put together a fantastic show. They have developed and continue to develop a strong set of artists who gather together at festivals to encourage strength and collaboration with one another. They also share their very inpirational quilts for the Rituals exhibit. Hats off to these very classy and strong women. The second article, "Rituals Gallery" focuses on Inspiring Quilts from the Dinner at Eight Artists. There are nine pieces by artists including Susan Brubaker Knapp with "I See the Moon," "Milo" by Jeanie Palmer Moore, ""Lost Rituals: Grief" by Susie Monday, "Cosmic Gears" by Loris Bogue, "Sunrise Serenade" by Barb Forrister, "8 of Cups" by Judy Coates Perez, "Walking with Mr. C and Scooter" by Gerrie Congdon, "Meditation" by Karen Ripps and "Boundary Waters 60 (Rock Time) by Virginia Spiegel. What an honor and blessing to be a part of this talented group of ladies. Here's to strong women. May we raise them. May we know them. May we be them! This exhibit is sponsored by Moore's Sewing Center ( http://www.moores-sew.com/ ) and Havel Sewing (http://www.havelssewing.com/). To read more about it, please visit http://dinnerateightartists.blogspot.com/ .  

Tuesday, September 18, 2012

Creating Texture and Dimension With Cloth

September is a busy month here in Austin and the fun continues. I will be teaching a free, mini workshop at the Austin Fiber Artist Recharge Zone on Wednesday, September 19, 2012. Come learn how fabric can be altered to provide color, texture and dimension to your work. For this mini workshop, please bring scraps of fabric (fat quarter size), some type of light weight fusible (preferably Mistyfuse), iron, ironing pad and pressing sheet, scissors and Timtex or Peltex. Optional supplies include textiva and Angelina fibers, sheer fabrics, netting, tulle, acrylic felt, yarns and fibers. Should be fun. The workshop will focus on creating texture and dimension with cloth. Hope to see you all there!