
Tuesday, March 22, 2011
Quilting Arts Magazine Article In The Spotlight Barb Forrister
Thursday, March 10, 2011
The Giving Tree: Unifying Color and Design
 |
| The Giving Tree (Full View) |
 |
| The Giving Tree (Detail View) |
Thursday, March 3, 2011
Nature's Aquarian Keyhole
 |
| Nature's Aquarian Keyhole (Detail View) |
 |
| Nature's Aquarian Keyhole (Full View) |
This waterscape with an underwater cave scene is a piece I have been wanting to do for a couple of years but up until now, I had not felt I could convey the texture in a satisfactory manner. In place of the more traditional colors, I have chosen to work in an analogous color scheme using blue, blue violet, violet and red violet. How to portray the rocky jagged feeling of stalactites and stalagmites has truly been a challenge! After more than a year of thoughts percolating through my mind, I have finally arrived at a very textured and tactile piece. Beginning with a hand dyed raw silk background, the ceiling and floor of the cave were collaged with dyed cotton, silk and acrylic felt to reinforce the main colors of the composition working from dark to light colors.The stalactites and stalagmites were texturized and "painted" with wool roving and dyed cheesecloth to illustrate the calcite formations. The larger freestanding stalagmites seen below are formed from heat distressed interfacing, a technique I learned in a workshop taught by Laura Beehler ( http://www.laurabeehler.com/) . Here, the idea is more subtle in comparison with heat distressed tyvek or lutradur but still offers a slightly upraised textural feel reminiscent of rock formations. Also shown are heat distressed, painted lutradur. Machine appliqued and quilted, the bottom section shows stalagmites in the midground with water depicted in and around the surrounding area. Here, I have used bright fluorescent Highlights trilobal polyester thread made by Superior Thread. The divers seen in the foreground were inked on a silk/cotton blend to provide sheen that is normally seen on spandex like diving suits. The edges of the quilt were completed with a facing.
This piece measures 36.5" X 48.5" and speaks of the many caves found in the Bahamas and Mayan areas. Often referred to as wondrous castles, these caves represent uncharted territories. Approximately 20% of known underwater caves have actually been recorded and scientifically documented. They provide a keyhole to learning about anoxic, oxygen free environments that date back tens of thousands of years ago. Primarily inhabited by crustaceans, scientists have also found numerous microbial populations, jellies and other fish that are mostly translucent and very small in size. To date, over 300 species have been confirmed. Considered to be the last frontier, these caves are very dangerous to explore and many lives have been claimed yet the allure of discovering new life remains. This piece has been very challenging but in the end, I am happy with the tactile and visual appearance. Still, sometimes, after working on a project like this for so long, I can't help asking myself, "What was I thinking?" LOL
Tuesday, February 1, 2011
Art In Fiber 2011 at The Copper Shade Tree Gallery
 |
| Call of The Wild |
The Art In Fiber 2011 Show will be held at The Copper Shade Tree Gallery in Round Top, Texas. You are cordially invited to the Opening Night Reception has been changed to Saturday, February 5th, 2011 from 2 p.m. - 6 p.m. Refreshments and wine will be served. There are 22 artists represented in this show that will continue through March 12, 2011. The theme is "Interpretation." Each artist was given a specific subject matter; a 3-D art piece, a poem, or a music selection to interpret and create an 11X14 fiber artwork. Artists who based their work on 3-D artwork entitled "Forest Floor" by Gerald Tobola include Letitia Rogers, Cindy Henneke, Andrea Brokenshire, Lana Book, Jo Sweet, Laura Ann Beehler, Janet Moran and Barbara Nilsson. Those creating artwork based on a poem by David
 |
| Eastern Bluebird |
Meischen include Barb Forrister, Leslie Tucker Jenison, Suzanne Selb White, Fannie Narte, Kate Owens, Annie Smith and Debbie Geistweidt. Finally, artists selected to create their artwork based on a music arrangement by the Copperleaf Quintet include Martha K. Grant, Martha Tsihlas, Gay Ousley, Jack Brockette, Connie Fahrion, Suzan Engler and Margery Hedges. Moonshadow is my interpretation piece based on the poem. Should be interesting to see how folks interpreted each of the three! The show was juried by Ginny Eckley and promises to be a wonderful and engaging. Come meet the artists on Friday evening. We are a very lively group and would love to see you! Please visit http://coppershadetree.com/index.php to learn more.
 |
| Amethyst Garden |
The show is comprised entirely of Texas Fiber Artists. Here is a sneak peak at some of my pieces that have been included. Some are 3 dimensional and others are very tactile. Please visit http://www.barbforrister.com/ for more information
.
 |
| Moonshadow |
 |
| Queen of The Nile |
Monday, January 17, 2011
Shadow Dancer: Part IV of Naturescape Gray Scale Series


 Shadow Dancer is Part IV of Naturescape Gray Scale Series and measures 41" X 36." This is my first piece to be completed in the New 2011 Year. In 2010, some of my resolutions included working in larger format, increasing scale, delving into texture and bringing things off the surface in order to create a more 3 dimensional effect. I had hoped that this piece would address all of those resolutions. Additionally, I have always found it more difficult to work solely in black and white and so this piece represented quite a challenge for me. I like to construct alot of my own surfaces by building layer upon layer of fibers. Finding myself short of only black, white and gray, I opted to throw in some of nature's rich truffle like colors for the trees. The trees in the background are made from dyed batting and are machine appliqued. Their canopies are thread painted. The larger two trees in the foreground are composed of upholstery fabrics and have been machine needlefelted with bits of wool roving to add texture. The tree to the left in the foreground is created by adding layers of dyed fabrics and fibers including cotton and cheesecloth to assemble a new cloth reminiscent of tree bark. It is also built up with several layers of batting to provide further dimension. Machine wrapped cording was used to represent ridges in the tree bark. The machine quilting reflects the crevices. The wolf is derived from a sketch and is composed of several layers of various fibers including cotton, velvet, silk and upholstery fibers. His eyes are painted with shiny 3 dimensional acrylic paint. The bush on the right is created in the same manner as mentioned in an earlier post on 3 dimensional foliage. Only this time, they were created in black and white. Machine wrapped cording was constructed and set in place as the stems. Leaves were tacked down in a 3D manner as to allow for the canopy to come off the surface. Machine appliqued and quilted with Aurifil thread.This piece is very tactile and serene. It is dedicated to the wolves that are being threatened today. Please visit Defenders of National Wildlife http://www.defenders.org/programs_and_policy/wildlife_conservation/imperiled_species/wolves/conferences_and_seminars/wolf_awareness_week.php to read more on the subject. In the end, I am happy with my start to the New Year and have resolved myself to continuing more in this vein by delving into texture and creating more 3dimensional pieces in large scale.
 Wednesday, January 12, 2011
Art In Corridor Quilt Exhibit in Austin, TX


 You are cordially invited to The Art In Corridor Quilt Exhibit sponsored by the Austin Area Quilt Guild. The show will feature more than 40 quilts on display January 10th through Friday, March 4th ranging from traditional to folk art and contemporary to fine art. I will have three pieces there including Autumn Splendor, Moroccan Play and Face of Serenity. Additionally, Group Conversations, a collaboration with Sherry McCauley, Kathy York, Connie Hudson, Barb Forrister, Leslie Tucker Jenison, Frances Holliday Alford, Pearl Gonzalez, Jean Dahlgren and Diane Sandlin will be on display. The Corridor of Art can be found in the lower level walkway connecting Travis County’s recently acquired office building at 700 Lavaca in Austin, Texas to the building’s parking garage. The opening reception will be held on Friday, January 14th from 5pm-8pm and is open to the public. Come meet the artists and peruse through the beautiful exhibit. Many pieces will be offered for sale. Parking is available on the street as well as the parking garage immediately north of the building. Entrance to the garage is on Guadalupe Street. Visitor's parking is located on the second floor. There is a charge for the garage parking and for the street meters. If you park in the garage, take the elevators to the lower level (LL) and the elevator will open straight into the Corridor of Art. If you enter the building via street level, take the escalator down to the lower level. Hope to see you all there!
Wednesday, January 5, 2011
3Dimensional Fiber Art Trees


 Happy New Year Everyone!!! Over the holidays, I decided to make another 3Dimensional tree. This time, the tree would have a treehouse! You know how they say ideas begin to percolate in your head and you just can't get them out? Well, I have been tossing this idea around for a few months now and it just won't leave me alone so I decided to satisfy my curiosity. Beginning with a 40" length of heavy duty copper wire coil that I purchased from Home Depot, I scored the outer jacket with a utility knife at both ends of the wire. One end was scored approximately 20" from the end while the other end was scored at about 7" from the opposite end. The middle section was left in tact. After scoring the plastic sheath, I ran the utility knife down from the scored line to the ends of the wire on both sides. The outer plastic sheath from the copper wire coil was and stripped at both ends and removed such that wire was exposed at each end with the sheath remaining in the middle. I then placed the length of the wire through a 13" length of PVC pipe. The longer length of exposed copper wires were separated from one another and bent to mimic the branches of the tree canopy. The remaining 7" of coil on the opposite end was left coiled together. In order to stabilize the piece while I worked, I placed the whole entire PVC and bottom portion of the tree in a tall cannister. I then took 2 pieces of approximately 10" coiled wire that was smaller in diameter and stripped the outer sheath to expose several small copper wires running together. The wires were completely separated and used to attach smaller limbs to the larger branches. A good pair of needle nose pliars is suitable for this job. The limbs and branches were wrapped with tsumugi silk blend of fibers and the ends were coiled in a loop to secure the wrapping. Once all the branches and limbs were wrapped, I began adding the foliage. Here, dyed lace and doilies with were cut into small pieces and floral wire was threaded through the holes in the lace and doilies. The opposite ends were twisted onto the branches to provide a canopy cover. The trunk containing the unsheathed wire and PVC pipe was wrapped with brown lace. The bottom exposed wire was fanned out and the ends of the wire were looped to assimilate the roots of the tree. The roots were also wrapped with brown lace to match the trunk. Dyed antique lace, perhaps from a ladies dress, undergarments or even gloves were hand stitched to the trunk of the tree to provide more texture. This piece stands approximately 31" high and has a 24-26" diameter canopy. I think it's a great place for a treehouse. And now, it's back to the drawing board to see what I can come up with for that treehouse. Maybe it might even be a tree village!
Wednesday, December 15, 2010
Eastern Bluebird


with a zig zag stitch along the edges. The canvas was painted blue to bring out the rich color in this male's plumage. Eastern Bluebird is heavily stitched with Superior trilobal polyester thread and rich beautiful colors from Aurifil as well. This piece is Part III of Miniature Naturescape Series following Finding Your Feet (Red Robin) and Tranquility (Yellow Warbler). I am really enjoying this series and still would like to revisit the concept of using the same bird in the first two of the series to recreate Spring and Winter settings. I suppose that will have to wait for another day. Today, I am heading back to the studio to try and finish a large wolf that is part of my Naturescape Grayscale Series. This piece is made of various materials and is very tactile. It also has black Misty Fuse leaves!
Tuesday, November 30, 2010
3D Foliage using Misty Fuse


 This piece is
 Wednesday, November 17, 2010
Moon Shadow: Part 3 of Naturescape Gray Scale Series

 Moon Shadow is Part 3 of my Naturescape Gray Scale Series. It measures 11X14 and is mounted on a stretched canvas. Part 1: Dark Shadow and Part 2: White Lightning focus more on landscapes whereas this piece concentrates on bringing nature up close and increasing scale. Another difference between this piece and the first two in the series is that Moon Shadow was created with an added emphasis on texture. This piece began by gathering and sorting every piece of white to black fabric that I had in my stash including all those wonderful pieces of velvet and upholstery fabrics. Yes, it is true that I did not stay entirely true to grayscale but instead opted for a hint of yellow in the eyes and in other parts of the fur. I think perhaps this added interest. When I first began designing this piece, I did not know if this grey wolf would present itself as feminine or masculine in nature. Once the eyes were in place, she let me know she was a she wolf. It was at that moment that she really started to come alive. The background is a commercial fabric. The wolf was composed of various hand dyed, commercial and upholstery fibers layered with extra batting to give added dimension and shape. My purpose was to really focus on texture and making her coat feel as though it was really indeed fur. This is one of the most tactile pieces I have made so far and I am really happy with the way she came to life. Silvery skeleton leaves were added to make her appear as though she is peering out from a nearby bush. She is named Moon Shadow for two reasons. Her setting is amongst the stars and the moonlight highlights her whitish gray coat. Also, I just love the play on words when I refer to my black and white series in terms of tints and shadows for their names. I am thinking that perhaps I should continue on with one more piece in this series featuring a jet black wolf upon a snow setting. I think that could be quite fun! Just wondering if I actually have the fibers make that piece!!!! In any case, I am really enjoying the idea of bringing nature up close by increasing scale.
Wednesday, November 10, 2010
Dinner At Eight Artists Meet at Houston IQF 2010

Wow, just getting back from Houston International Quilt Festival and beginning to blog. This year's exhibits were amazing. I loved the SAQA Sightlines and Creative Force show. Such wonderful artists! Another fantastic show was Beneath The Surface curated by Jamie Fingal and Leslie Tucker Jenison. The exhibit consisted of 37 Dinner At Eight Artists and featured a very strong and diverse body of art. I was unable to make the debut in Long Beach and really was looking forward to seeing the travelling show come to Houston. No photography was allowed in this exhibit but the security guard made an exception to allow me to have my photograph taken in front of my Treasured Waters piece. I really wish I could have photographed the entire exhibit. It was so well done. Kudos to Jamie and Leslie and the folks at IQF. On Friday night, the artists met for dinner to discuss the inspirations for
 for their artwork and interpretations of the theme, Beneath The Surface. One theme, so many amazing and different interpretations, each with such powerful stories behind them. Having heard these stories, it was not surprising that this was such a fantastic presentation! What a fabulous group of women! I am truly blessed to be a part of this group. Had a wonderful time visiting with each and every one of the artists that were able to make the journey to Houston. Center left photo shows Linda Minton, Leslie Tucker Jenison and Judy Coates Perez. Below, here I am with Frances Holliday Alford. Good food, good wine and great conversation. And as Rachel says, "Here's to Great Women. May We Raise Them. May We Know Them. May We Be Them." Dinner At Eight Artists present included Jamie Fingal, Leslie Tucker Jenison, Deborah Borschert, Jane Lafazio, Linda Minton, Rachel Parris, Judy Coates Perez, Frances Holliday Alford, Sarah Ann Smith and Barb Forrister. What a fantastic evening!
Wednesday, November 3, 2010
Studio Art Quilts Associates Inc. Portfolio 17: The Art Quilt Sourcebook


I am thrilled to announce the release of Studio Art Quilts Associates Inc. Portfolio 17: The Art Quilt Sourcebook. It is hot off the press and this is the first year it is being offered in both digital and hard copy format. This publication showcases work from professional SAQA quilt artists all around the world. This year, my piece, Generation Y: Song of Hope has been honored as People's Choice at The Wesley Art Gallery and received second place at the Austin Area Quilt Guild Changing Gears Show. Kind of funny, since it emulates today's world. To read more, please visit http://freespiritartstudio.blogspot.com/search/label/Generation%20Y%3A%20%20Song%20of%20Hope . This piece can also be found in the Studio Art Quilts Associates Inc. Portfolio 17: The Art Quilt Sourcebook here http://www.nxtbook.com/nxtbooks/saqa/portfolio17/#/75/OnePage . To see a digital copy of this catalog, please visit http://www.nxtbook.com/nxtbooks/saqa/portfolio17/#/1/OnePage or to order a hard copy, please visit the SAQA store or better yet, stop by Houston International Quilt Festival SAQA booth to pick up your copy in person. This is a wonderful publication that comes out annually. Many thanks to Lisa Chipetine and Cheryl Dineen Ferrin for bringing this wonderful publication to fruition!
Friday, October 29, 2010
Fiber Art Trees and 3D Foliage at Quilting Arts Make It University Open Studios


I have been invited to demonstrate in the Quilting Arts Make It University Open Studios On Saturday, November 6 from 12:00 to 2:00 p.m. at the International Quilt Festival in Houston. I will be demonstrating how to make 3 dimensional fiber art trees and foliage. This tree has been designated as part of The Village Project, a challenge issued by Kathy York. When she first approached me about participating in the project, the whole idea seemed quite intriguing. I knew what I would do for the house but my propensity for nature led me to inquire about trees for the project. The response was, "Go for it!" Never having made a 3 dimensional tree before, I was filled with ideas. About the same time, I was contacted by Lindsey Murray of Quilting Arts Magazine who asked if I might be interested in demonstrating some of my work. This fiber art tree seemed a perfect fit! This has been a challenging but rewarding experience. If you have a chance, please stop by and visit. I would love to see you!
Wednesday, October 27, 2010
Eye of the Quilter


Eye of The Quilter is a reflection on words and images. These three photos were selected in a special exhibit to be shown at The International Quilt Festival in November 2010. They reflect inspiration gathered from photos. The top photo, White Ibis was taken at Hilton Head in South Carolina and tells a story. The white ibis as a species is becoming increasingly endangered by humankind. Our desire to take over their habitat continues to displace them. This photo is a reflection of the time and signals that change is imminent. The second photo, Riverwalk in San Antonio, Texas is one of the most beautiful places in Central Texas. Spectacular by day, it is even more stunning at night. Amidst the reflection of the water lies a story rich in culture and history. For centuries, people have gathered here and history has been made. The third photo, Glass Menagerie was taken in Round Top, Texas and refers to dreams that are held within the jeweled glass. As we look into the bevelled surface, we can't help getting lost in it's beauty. Our mind reflects on times past and dreams of the future. I am thrilled that these three pieces were chosen to be a part of this special exhibit and look forward to seeing the exhibit in its entirety. I am always amazed at where artists get their inspiration. If you have a chance, please stop by and visit the exhibit at The George Brown Convention Center on November 3-7, 2010.
Friday, October 15, 2010
Artist Village Project

 |
| Beginning of Artist Village |
I have been working with bringing more dimension to my work and what better way to try it then making a soft sculpture of an adobe style home? Growing up in New Mexico, the predominant architectural style is Southwest Adobe which is a blend of both Native American as well as Spanish cultures and influences. The Anasazi Indians dating back to the time of Christ were well known for their cliff dwellings and later, pueblo style of living. Their homes resembled stacked rectangular units made of mud. When the Spaniards came to New Mexico in the late 1500s, they began adopting the pueblo style of architecture but with a few differences. Mud adobe bricks were assembled with straw and homes were set apart from one another. Still, centuries later, the two styles merged together to reflect the blending of both cultures. This contemporary southwest adobe is reminiscent of the neighborhood in which I grew up. To mimic this in 3D using fiber has been a challenge. I wanted the piece to be durable and consequently, choices with regards to materials used for structure and foundation were extremely important. The structural forms, I chose resemble styrofoam but are actually ethofoam, a product that when bent does not snap in two as would styrofoam. The walls are composed of layered and quilted fabric with fused windows and doors. The colors employ the traditional earth tone browns and peaches accented with turquoise trim and red rug weavings and chili ristras. This piece is still a work in progress. It will have 5 interconnecting units with vigas incorporated and the roofs will be finished in the traditional style. Pottery will be displayed to further give that Southwest feel. I am stringing a chili ristra and will paint the woven rugs to impart a darker maroon red rather than orangy red. I had thought about making an "chimenea," a traditional outdoor stove but realized it would come down to the stove or the ladder. One would have to be sacrificed and I really like the way the ladder looks at the moment. Though, it is still in the planning stage and anything can still change at this point, for now, I will finish the two remaining units and the tops on all five, one level at a time and see where it takes me. Normally, I do not post works in progress but perhaps I should more often. The finished piece will be set on a twelve inch square and be approximately twenty inches in height. This piece is intended to be part of a collaboration with fourteen international artists and will collectively be called The Village Project. Should be interesting to see what everyone comes up with!

Wednesday, October 6, 2010
More 3Dimensional Flowers
 I have been working on 3Dimensional flowers lately and this is the second piece I have come up with. It measures 16X12 and is intended to be part of a group collaboration. The purple flowers reminiscent of the the others found in Amethyst Garden are composed in two ways. Two of these flowers are layered with assorted synthetic fabrics and machine thread painted to simulate the lines found in nature. The other purple flower to the far left is made of color catcher sheets that have absorbed excess dye from one of my dyeing sessions. It too is thread painted but in a more subtle way since it is in a shadowed area. In fact, the purple flower to the far right was inked to appear slightly darker than the middle flower but yet lighter than the far left flower. The tiger lilies are comprised of various natural and manmade fibers layered together and finally overlayed with a sheer orange synthetic fiber. Each petal was assembled individually, thread painted and joined together to create the whole flower. The flower was inked and edges were painted with a mixture of acrylic paint and gel medium. The pistils were composed of fibers wrapped together and joined to machine wrapped cording for stems. The leaves and sepals for both types of flowers are made of dyed batting and attached by hand to the stem and base of each flower. Lacy ferns were cut from dyed silk paper and were an absolute bear to make but I am happy with the way they provide a backdrop for the lilies. Once the composition was complete, I layered the hand dyed, background and completely quilted it before attaching any of the 3 dimensional flowers. When I finished quilting the entire piece and laid the design elements back on it, I decided to change the composition yet again. Instead of having the quilted ferns as backdrops where the intended 3Dimensional ferns were to go, I moved the actual ferns to the other side to create repeat design elements from one side to another. Once I was happy with the final design, I proceeded to hand stitch each element down with matching embroidery floss. Edges were finished with a facing. In the end, these purple flowers are probably the same size as the ones in Amethyst Garden but it is the change in background that allows for the Tiger Lilies to be incorporated in a successful manner whereas with Amethyst Garden, the tiger lilies would have overwhelmed the whole piece. All in all, I am happy with the way both pieces turned outand love the way each one seems to take on it's own personality. My next project is a 3dimensional adobe house. Now that should indeed prove to be challenging!!!
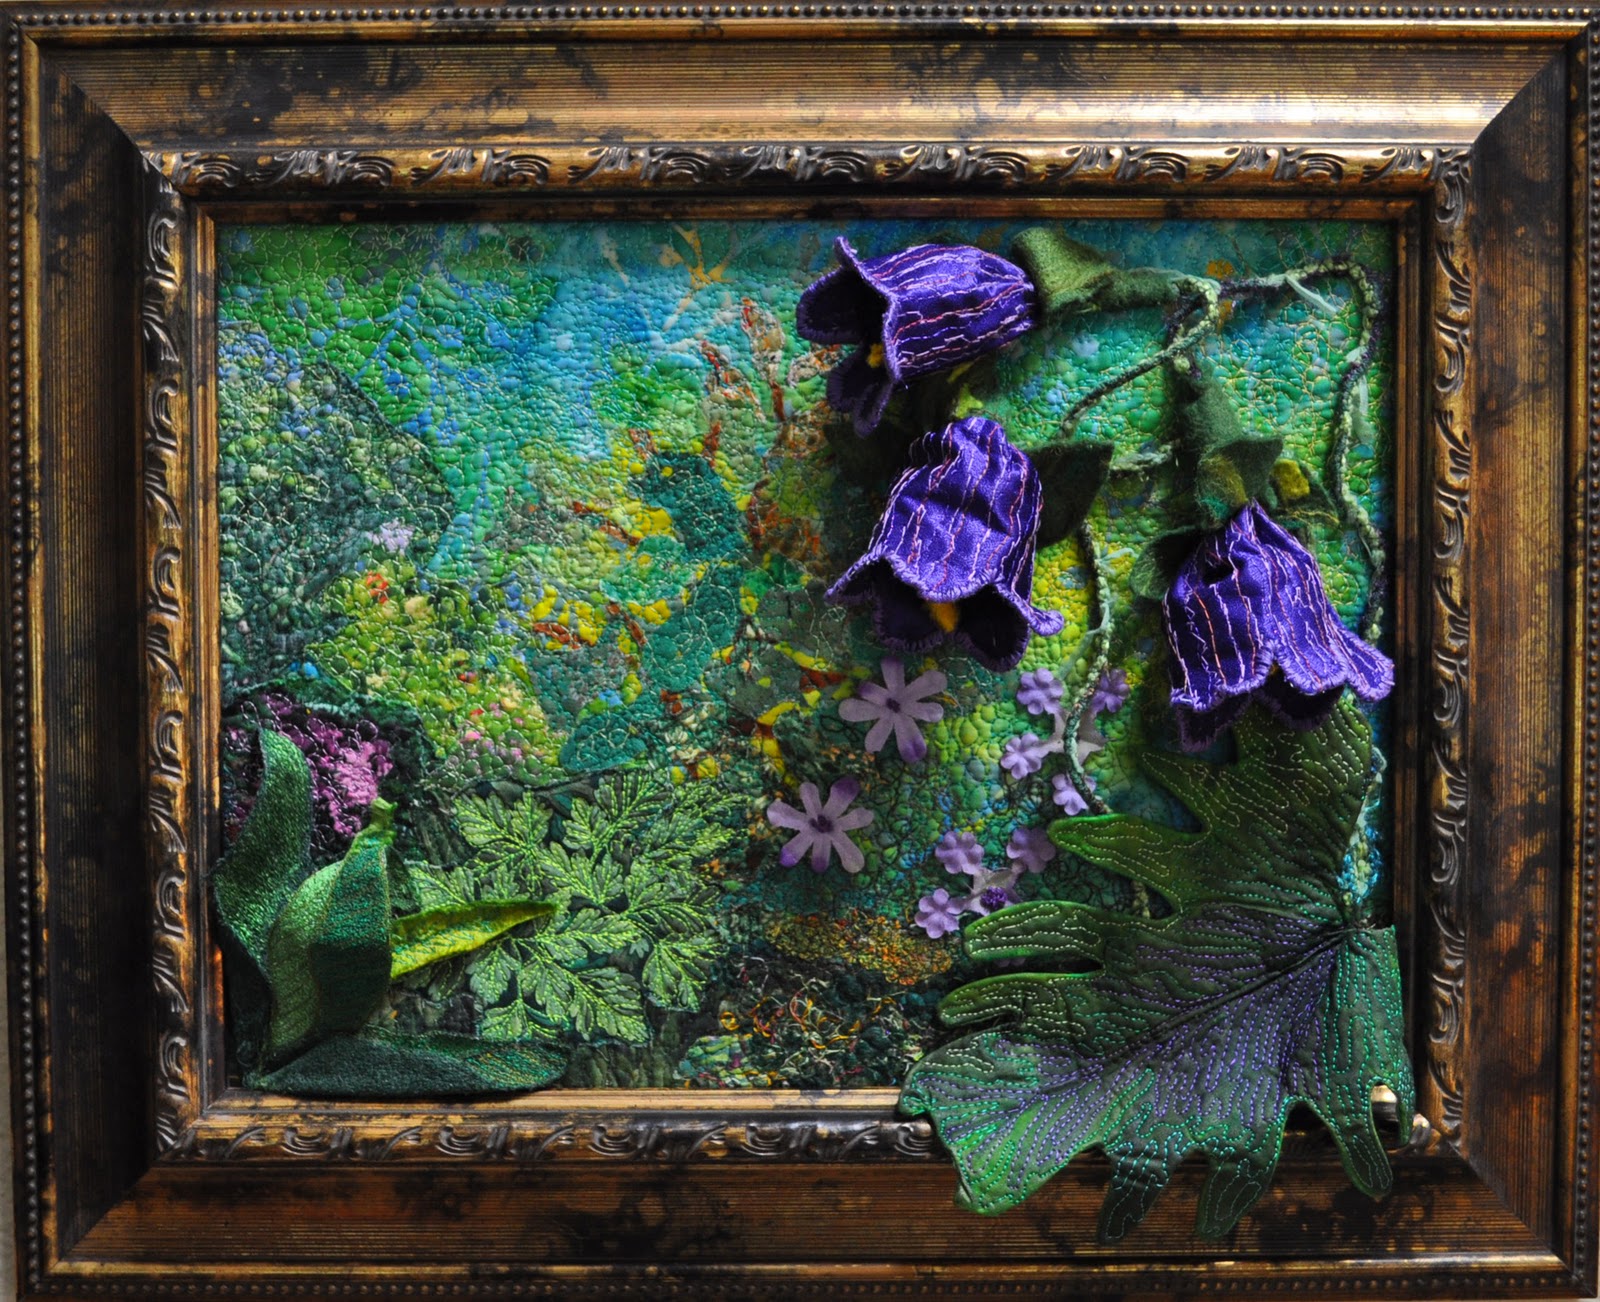
Wednesday, September 29, 2010
Amethyst Garden


Tuesday, September 14, 2010
Austin Area Quilt Guild Changing Gears Quilt Show


The Austin Area Quilt Guild will be hosting Changing Gears Quilt Show on Friday, September 17 thru Sunday, September 19, 2010 at The Parmer Events Center located at 900 Barton Springs Blvd in Austin, Texas. More than 400 quilts will be on display along with more than 65 vendors in attendance. There will also be a Boutique Sale featuring handmade items, a silent auction, children's activities, live demonstrations, wearable art as well as a chance to win a spectacular raffle quilt. This is the first year at The Parmer Events Center and also the first year that some of the quilts will be offered for sale. Today, I helped hang the show. Got to meet a whole lot of nice folks and see all the amazing talent in Austin. The show will be judged by De Leclair, Connie Silber, Marilyn Hardy, Nell Smith and Serena Stiles Vrnak. There will also be a Studio Art Quilt Associates booth featuring 12 X 12 quilts from some of Texas' finest artists. So much happening under one roof and close to beautiful Lady Bird Johnson Lake. Please visit http://www.aaqg.org/show2010/about.php for more information. Hope to see you there!!! Added on Monday, September 20, 2010: Generation Y: Song of Hope placed second in the 400 Category Art Quilts, Large and Small at The Austin Area Quilt Guild Changing Gears Quilt Show. Little Rascals received an Honorable Mention, an overall award for Creativity in small quilts division and Judges Choice by Nell Smith. When I helped hang the show, I thought to myself I would be doing good to get an Honorable Mention. You can imagine how surprised I was at the award ceremony on Thursday evening. Competition was stiff. So much talent under one roof. I am humbled to be a part of this wonderful Austin community. To see pictures, please visit http://www.facebook.com/home.php?#!/album.php?aid=2067189&id=1125886821&ref=mf
Friday, September 10, 2010
Miniature Nature Series: Finding Your Feet and Tranquility


 These two pieces were composed specifically for Alzheimers Art Quilt Initiative and Studio Art Quilt Associates Texas @ Houston 2010. Both are 9X12 and portray birds in nature. The top two photos, "Finding Your Feet," show a robin that has just landed on a branch. The next two photos show a finch or warbler of some sort. For this piece, I did a mirror image of the first bird and inked it in different colors. Standing him at a different angle made him appear quite differently, a dash of serendipity. What do they say, how to kill two birds with one stone. Time was running out and these needed to be done very quickly. Because I wanted these two pieces to look different from one another despite the fact that I had used the same sketch for both, albeit in mirror image, I decided to place them in very different settings. Finding Your Feet appears to be set in the summer while Tranquility is reminiscent of fall. Both have a very different feel and I was especially pleased when I pointed out to my husband that they were the same bird, just with different colors, in mirror image and set at different angles in completely different settings. While I am still not sure he believes me, it is true nonetheless. I would have loved to have taken the same bird and made the remaining two spring and winter seasons. Wonder what that would have looked like... Perhaps I will start out all over again with a different sketch and revisit this concept. Now, the only question is which piece goes to which venue? What do you think?
Subscribe to:
Posts (Atom)